在開始之前,您可以找到有關(guān)創(chuàng)建 WooCommerce 支付網(wǎng)關(guān)的完整教程(閱讀本文前,請務(wù)必閱讀它),但在最新版本的 WooCommerce(我猜是從 8.3 開始)中,您可能會(huì)注意到您的自定義付款方式在結(jié)賬區(qū)塊中不可用。
例如,如果您嘗試停用商店中除自定義付款方式之外的所有付款方式,您可能會(huì)收到如下錯(cuò)誤消息:

但可以肯定的是,當(dāng)您使用舊的[woocommerce_checkout]簡碼時(shí),一切都運(yùn)行良好。
是的,之前發(fā)布的支付網(wǎng)關(guān)教程似乎不再完整,但我們今天將通過這個(gè)額外的教程來更改它,我將逐步指導(dǎo)您應(yīng)該做什么,以添加自定義的兼容性WooCommerce 購物車和結(jié)帳塊的 WooCommerce 付款方式。
這就是我們在本教程結(jié)束時(shí)要實(shí)現(xiàn)的目標(biāo):

當(dāng)然,我還會(huì)向您展示一些巧妙的額外內(nèi)容,例如為您的付款方式添加自定義圖標(biāo)。
服務(wù)器端集成
首先,讓我們從服務(wù)器端集成開始,我很確定你們中的許多人都覺得使用 PHP 開發(fā)比 JavaScript + React 更舒服,所以讓我們從簡單的事情開始。
注冊一個(gè)塊支持 PHP 類
“區(qū)塊支持PHP類”是除主要支付網(wǎng)關(guān)類之外的PHP類。我們將使用下面的簡單代碼片段來注冊它,這與我們在 woocommerce_payment_gateways hook 中注冊主網(wǎng)關(guān)類時(shí)所做的類似。
add_action( 'woocommerce_blocks_loaded', 'rudr_gateway_block_support' );
function rudr_gateway_block_support() {

	// if( ! class_exists( 'Automattic\WooCommerce\Blocks\Payments\Integrations\AbstractPaymentMethodType' ) ) {
	// 	return;
	// }

	// 在這里引入 "gateway block support class" 文件
	require_once __DIR__ . '/includes/class-wc-misha-gateway-blocks-support.php';

	// 注冊我們剛才引入的 PHP 類
	add_action(
		'woocommerce_blocks_payment_method_type_registration',
		function( Automattic\WooCommerce\Blocks\Payments\PaymentMethodRegistry $payment_method_registry ) {
			$payment_method_registry->register( new WC_Misha_Gateway_Blocks_Support );
		}
	);

}
請記住以下幾點(diǎn):
- 我注銷了
class_exists()條件,因?yàn)槲覀儾辉傩枰驗(yàn)榻Y(jié)賬塊現(xiàn)在是 WooCommerce 的一部分,而不是獨(dú)立的插件。 - 我們的塊支持 PHP 類本身將位于一個(gè)單獨(dú)的文件中,我們將在下一步中
class-wc-misha-gateway-blocks-support.php查看它。
塊支持 PHP 類
在這一部分中,我將創(chuàng)建一個(gè)WC_Misha_Gateway_Blocks_Support PHP 類來擴(kuò)展 WooCommerce 的 AbstractPaymentMethodType 類。同時(shí)不要忘記我們已經(jīng)有了擴(kuò)展 WC_Payment_Gateway 的WC_Misha_Gateway 類。
就我而言,我將其放入includes/class-wc-misha-gateway-blocks-support.php.
<?php
use Automattic\WooCommerce\Blocks\Payments\Integrations\AbstractPaymentMethodType;

final class WC_Misha_Gateway_Blocks_Support extends AbstractPaymentMethodType {

	private $gateway;

	protected $name = 'misha'; // payment gateway id

	public function initialize() {
		// get payment gateway settings
		$this->settings = get_option( "woocommerce_{$this->name}_settings", array() );

		// you can also initialize your payment gateway here
		// $gateways = WC()->payment_gateways->payment_gateways();
		// $this->gateway  = $gateways[ $this->name ];
	}

	public function is_active() {
		return ! empty( $this->settings[ 'enabled' ] ) && 'yes' === $this->settings[ 'enabled' ];
	}

	public function get_payment_method_script_handles() {

		wp_register_script(
			'wc-misha-blocks-integration',
			plugin_dir_url( __DIR__ ) . 'build/index.js',
			array(
				'wc-blocks-registry',
				'wc-settings',
				'wp-element',
				'wp-html-entities',
			),
			null, // or time() or filemtime( ... ) to skip caching
			true
		);

		return array( 'wc-misha-blocks-integration' );

	}

	public function get_payment_method_data() {
		return array(
			'title'        => $this->get_setting( 'title' ),
			// almost the same way:
			// 'title'     => isset( $this->settings[ 'title' ] ) ? $this->settings[ 'title' ] : 'Default value';
			'description'  => $this->get_setting( 'description' ),
			// if $this->gateway was initialized on line 15
			// 'supports'  => array_filter( $this->gateway->supports, [ $this->gateway, 'supports' ] ),

			// example of getting a public key
			// 'publicKey' => $this->get_publishable_key(),
		);
	}

	//private function get_publishable_key() {
	//	$test_mode   = ( ! empty( $this->settings[ 'testmode' ] ) && 'yes' === $this->settings[ 'testmode' ] );
	//	$setting_key = $test_mode ? 'test_publishable_key' : 'publishable_key';
	//	return ! empty( $this->settings[ $setting_key ] ) ? $this->settings[ $setting_key ] : '';
	//}

}
首先讓我們看一下類的屬性和方法。
屬性:
$name– 這是此步驟中的支付網(wǎng)關(guān) ID 。$gateway– 我們可以在這里存儲支付網(wǎng)關(guān)對象的實(shí)例,但這不是必需的,所以我在代碼中注釋了這部分。
方法:
is_active(),get_payment_method_script_handles()– 這是我們包含 JavaScript 文件的地方,其中包含集成的客戶端部分。get_payment_method_data()– 提供您將在前端作為關(guān)聯(lián)數(shù)組使用的所有必要數(shù)據(jù)。
您還可以使用index.asset.php來獲取腳本版本和依賴項(xiàng)。
public function get_payment_method_script_handles() {

	$asset_path   = plugin_dir_path( __DIR__ ) . 'build/index.asset.php';
	$version      = null;
	$dependencies = array();
	if( file_exists( $asset_path ) ) {
		$asset        = require $asset_path;
		$version      = isset( $asset[ 'version' ] ) ? $asset[ 'version' ] : $version;
		$dependencies = isset( $asset[ 'dependencies' ] ) ? $asset[ 'dependencies' ] : $dependencies;
	}

	wp_register_script(
		'wc-misha-blocks-integration',
		plugin_dir_url( __DIR__ ) . 'build/index.js',
		$dependencies,
		$version,
		true
	);

	return array( 'wc-misha-blocks-integration' );

}
聲明兼容性
當(dāng)您想讓用戶知道您的付款方式與 WooCommerce Checkout 塊不兼容時(shí),此部分通常很有用。
當(dāng)用戶嘗試編輯古騰堡中的結(jié)賬頁面時(shí),他們將收到通知:

方法如下:
add_action( 'before_woocommerce_init', 'rudr_cart_checkout_blocks_compatibility' );

function rudr_cart_checkout_blocks_compatibility() {

    if( class_exists( '\Automattic\WooCommerce\Utilities\FeaturesUtil' ) ) {
        \Automattic\WooCommerce\Utilities\FeaturesUtil::declare_compatibility(
				'cart_checkout_blocks',
				__FILE__,
				false // true (compatible, default) or false (not compatible)
			);
    }

}
客戶端集成
設(shè)置項(xiàng)目
再次強(qiáng)調(diào),我希望本教程中的內(nèi)容保持超級簡單,因此我將使用@wordpress/scripts即可。
在我們的構(gòu)建中,您肯定可以進(jìn)一步配置 WooCommerce 混合構(gòu)建,這樣您就可以使用import { registerPaymentMethod } from ....
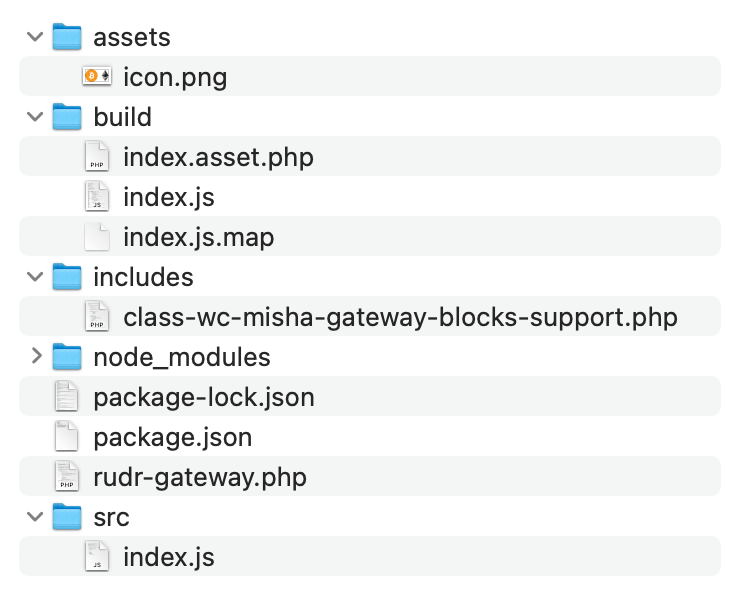
這就是我的文件夾結(jié)構(gòu)的樣子:
為 WooCommerce Checkout 區(qū)塊注冊自定義付款方式
以下是/src/index.js文件,以防您有疑問。
import { decodeEntities } from '@wordpress/html-entities';

const { registerPaymentMethod } = window.wc.wcBlocksRegistry
const { getSetting } = window.wc.wcSettings

const settings = getSetting( 'misha_data', {} )

const label = decodeEntities( settings.title )

const Content = () => {
	return decodeEntities( settings.description || '' )
}

const Label = ( props ) => {
	const { PaymentMethodLabel } = props.components
	return <PaymentMethodLabel text={ label } />
}

registerPaymentMethod( {
	name: "misha",
	label: <Label />,
	content: <Content />,
	edit: <Content />,
	canMakePayment: () => true,
	ariaLabel: label,
	supports: {
		features: settings.supports,
	}
})
也許詳細(xì)討論 registerPaymentMethod() 以及討論 registerExpressPaymentMethod()是一個(gè)好主意,但我認(rèn)為我們將在我的博客上的下一個(gè)教程中更深入地研究特定示例。
最后!恭喜你!
如果您想知道付款方式標(biāo)題和說明的來源:

添加付款方式圖標(biāo)
由于我向您承諾了更多示例,并且您可能不想等到下一個(gè)教程,所以讓我們從這個(gè)開始。
我現(xiàn)在的目標(biāo)是在 WooCommerce Checkout 塊中的自定義支付網(wǎng)關(guān)標(biāo)題附近顯示一個(gè)圖標(biāo):
首先,讓我們修改我們的塊支持 PHP 類,特別是它的get_payment_method_data(),我們將在那里提供另一個(gè)參數(shù):
public function get_payment_method_data() {
	return array(
		'title'        => $this->get_setting( 'title' ),
		'description'  => $this->get_setting( 'description' ),
		'icon'         => plugin_dir_url( __DIR__ ) . 'assets/icon.png',

		...
然后我建議為其創(chuàng)建另一個(gè) React 組件:
const Icon = () => {
	return settings.icon
		? <img src={settings.icon} style={{ float: 'right', marginRight: '20px' }} />
		: ''
}

const Label = () => {
	return (
        <span style={{ width: '100%' }}>
            {label}
            <Icon />
        </span>
    );
};
如果未提供圖標(biāo)圖像 URL,則不會(huì)顯示<img>標(biāo)簽,太棒了!
聲明:原文出自 https://rudrastyh.com/woocommerce/checkout-block-payment-method-integration.html ,由WordPress大學(xué)翻譯整理,轉(zhuǎn)載請保留本聲明。


看到最后就對了,我說怎么看這文章不像國內(nèi)的文章
機(jī)器翻譯搬過來的?